The Beginnings of my first Arduino project!
After spending a good portion of my week working solely on software, I was excited to do some hands on computing with an addressable RGB LED strip that arrived just in time for the weekend. I called up my friend and we decided to meet up the next day to get this bad-boy working. I couldn't wait to see the LEDs blink and change color, because once I got past that, it would open so many doors. Fast forward to the end of the next day where the LED strip was, well, just an expensive piece of plastic. No shiny lights or changing colors. Let me try to explain what happened...
Frustrations
When I finally got to work on the LED strip I quickly looked up a circuit/breadboarding diagram for the strip and plugged everything exactly where it should go... Or at least I thought. I fired up the arduino and uploaded some sample code to the board. And bam! Nothing happened. Back to the drawing board, where I spent a good 2-3 hours trying to debug what was wrong. What I realized during that time is that I leaned to what I was more comfortable doing. At first, I tried debugging the code, the software side. I understood everything it did and put in some debug statements. Everything was working the way it should have been in terms of the code.
After I deduced that it wasn't a software problem, I looked at the hardware and realized I had a very limited understanding of what was going on. I knew the basics, but even after some time googling the problem, it still was not working. I gave up that day and decided to ask for help from someone who definitely knew more than me.
Asking for Help
The next day I jumped at the first chance I had to ask about this problem I was having. After spending some time talking to one of the instructors at my university, we finally figured out the problem. I was trying to send data to the LED strip through the Data OUT side instead of the Data IN side. I spent hours on this simple hardware problem that only took a couple of minutes with a mentor to solve.
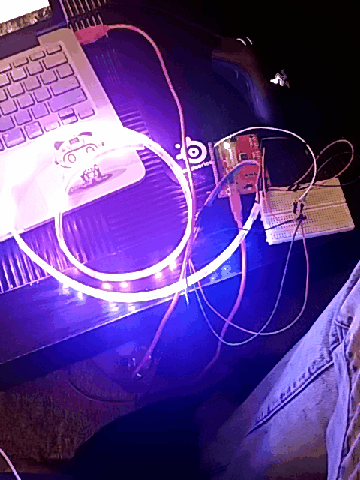
The Finished Product
Here's what I was able to accomplish at the end of the day:
What I learned
Step outside of your comfort zone. Software is my comfort zone and I tried to stay away from hardware as much as I could. In the end, debugging hardware allowed me to learn and grow in understanding. In the end, you won't grow if you are always in your comfort zone doing the same things you already know how to do.
Don't be afraid to ask for help. Asking for help could be one of the hardest steps. I know for myself personally, I try my hardest to figure out a problem before opting to ask someone for help. But over the years I've realized there's nothing to lose from asking for help. My experience with this problem is a prime example. Not only was I able to get the LED strip working in a couple of minutes and understand what was happening, I was given some parts to get it working. It was a win-win situation.
Implementing my Knowledge
Before we get started, here's what I built!
What is it?
What I implemented is a RGB LED Strip that would change color based upon the input of the potentiometer. As the potentiometer is turned, the LED strip will react to the value of the potentiometer.
When I first got the LED Strip up and running, I instantly had a sweet idea to use it for some back-lighting for my desk. So for this project I simply used some double sided tape and put one long strip on the upper part of my desk. I slapped the LED Strip on there and bam, instant mood lighting!
Materials
- 1000uf capacitor
- Potentiometer
- RGB LED Strip - Addressable
- Arduino Uno
- Double Sided Tape
- Desk!
The Code
#include <Adafruit_NeoPixel.h>
#include <avr/power.h>
#define PIN            6
#define NUMPIXELS      52 // change this to how many leds you have in your strip

// initialize strip
Adafruit_NeoPixel pixels = Adafruit_NeoPixel(NUMPIXELS, PIN, NEO_GRB + NEO_KHZ800);

int potPin = A0;

void setup() {
#if defined (__AVR_ATtiny85__)
  if (F_CPU == 16000000) clock_prescale_set(clock_div_1);
#endif
  pixels.begin(); // This initializes the NeoPixel library.
}

void loop() {
  // For a set of NeoPixels the first NeoPixel is 0, second is 1,
  // all the way up to the count of pixels minus one.
  int init = analogRead(potPin);
  int potValue = init / 4;
  setColor(potValue, potValue-255, potValue-127);
}

void setColor(int r, int g, int b) {
    for(int i=0;i<NUMPIXELS;i++){
    // pixels.Color takes RGB values, from 0,0,0 up to 255,255,255
    pixels.setPixelColor(i, pixels.Color(r,g,b)); // set pixel color.
    pixels.show(); // This sends the updated pixel color to the hardware.
  }
}
}
This code is pretty simple, all I do is take in input from the potentiometer which is set as init. I then scale that value to work with rgb values by dividing by four which is the variable potValue. After that, I set the color of the strip using a for loop and differing values depending on the potentiometer value.
The Circuit

This circuit is pretty simple as well! All I have are two main components: the LED RGB Strip and the Potentiometer. Just connect each one to ground and power and then for the LED strip connect the data portion to one of the Input pins designed for PWM. For the potentiometer connect the remaining data portion to analog in to read data from the potentiometer. After you have that, you're pretty much all set. You now have a working mood light if you did everything correctly!